Monday, 25 February 2013

Sponged Doilies

We had another technique class last week and did some sponging and masking. We tried a few different techniques and sponged on different types of card. The first card we made I have already shown you here, we used a heart from the more amore speciality papers to sponge through on very vanilla card stock. For the next card we used the paper doilies from the new seasonal catalogue and sponged using bashful blue ink onto glossy card.

 It is a really simple but effective technique, here is a close up. The sentiment is from the curly cute stamp set.
After I had finished with the doilie I cut out the middle and used it as trim, waste not want not! The card was topped off with some butterflies, stamped using papillon  popourri set and punched out with the bitty and elegant butterfly punches, so quick and easy.
If you would like to learn some new techniques and get the most out of your supplies, as well as have some fun and meet new people why not join one of my classes?

Saturday, 16 February 2013

Hearts a flutter Chalk Board

I have been playing a lot with the hearts a flutter stamp set and More Amore papers. When I saw this wooden heart shaped chalk board I knew it would look great with these papers.
Here is what I came up with:
 I also used things from the artistic embellishment kit, Here are a couple of close ups. I should have taken a photo before I decorated so that you can compare, but didn't think of that till after!


Sunday, 10 February 2013

Julie's Jems Team Training

I joined the wonderful Julie Kettlewell's team training again yesterday. I had a great day as usual, got some brilliant swaps and met up with new and old friends. I am very motivated again, watch this space....! I did an inspiration station featuring the More Amore suite. Here's a photo, (sorry about the qualilty). I will be showing you more about the projects in future posts.
Sharing ideas and meeting new friends is one of the great things about being a Stampin' Up demonstrator.  If you have been thinking about becoming a Stampin' Up Demonstrator Sale-a-bration is a great time to join as you will get  £162.50 of products of your choice  plus business supplies for just £99 and it's shipped for Free. Why not take a look at my Join page or contact me for more information.

Monday, 4 February 2013

Using your embossing folder as a stamp!

Here is a great way to get more out of your embossing folders and you don't even need a big shot.

  • Ink up your brayer
  • Brayer the ink over the raised side of the embossing folder
  • Place your card on the other side of the embossing folder
  • Carefully close your embossing folder
  • Wash and dry your brayer
  • Firmly brayer over the top of your folder
  • Open up folder and you should have a flat image of your embossing folder design
  • Wash and dry your folder!
You could also try this using the other side of the image. I have even used versa mark ink then heat embossed.  This is a great way to give your embossing folders a whole new lease of life.

This is another card we made in the faux mother of pearl/elements of style class. I inked the honey comb folder in raspberry ripple ink and used pretty in pink card. I used shimmer paint to ink up the hummingbird stamp.
I sponged over the card as well to give a more vintage look. 

Sunday, 3 February 2013

Honey Comb Elements of Style

This is another of the cards we made at class using the faux mother of pearl technique. This time we also used the honey comb embossing folder which is in the spring/summer catalogue, this is fast becoming one of my favourites.
To make the hexagons just pop your card (or paper) in the folder and run through the bigshot then cut the hexagons out. You will notice some little butterflies, these are made using the bitty butterfly punch, again from the new seasonal catalogue. I used the Elements of Style stamp set again, another favourite!
We also made a bagalope, this is a little bag made out of an envelope, then cut your card blank in half, one for front and one for back. I used a velcro dot to fasten.

All the cards we made are flash cards, so don't use that much card.
Tomorrow I will show you a great new way of using your embossing folders.

Saturday, 2 February 2013

Faux Mother of Pearl Technique

A few weeks ago we made an ATC holder. The idea being that if we learned a technique in class then we would make an ATC, (artistic trading card) with the technique on to keep in our holder. On Wednesday we did the faux mother of pearl technique, this is simple but really effective. 

  • Put a little bit of frost white shimmer paint in a little lid/saucer.
  • Scrunch up a piece of cling film and dip it into the paint
  • Dab excess paint off onto the side of the lid.
  • Dab shimmer paint onto very vanilla card, make sure you leave some bits without paint.
  • Leave to dry - it shouldn't take long.
  • Use a sponge or sponge dauber to sponge some ink on the card, you could use baja breeze, crumb cake, pretty in pint etc... dependent on the colours in your card.
  • Stamp on your image using black stazon ink
  • Colour in your image, I used aqua painter and ink pads
Here are some ATC's I made using the Elements of Style stamp set.

sponged with Baja breeze ink

sponged with crumb cake ink
It gives a lovely effect doesn't it? This is one of the cards we made, the colour scheme is pretty in pink and raspberry ripple so I used pretty in pink ink to sponge.


Friday, 1 February 2013

ILWS Blog Hop - More Amore Shadow Box

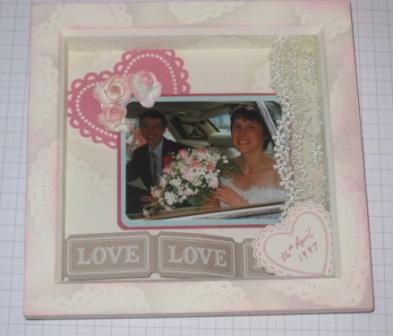
 Hello, you have probably popped over from the lovely Claire's blog. I have been very busy playing with products from the Spring/Summer Seasonal catalogue.  It is full of gorgeous goodies and the first thing I want to show you is a Shadow Box that I decorated and used to display one of our wedding photos.  It is a 6 x 6 plain wood shadow box that I bought from the Range and painted  with some cream acrylic craft paint. I used the More Amore Speciality papers, Hearts a Flutter stamp set/framelits and the Artisan Embellishment Kit. I thought the wide lace and flowers really complemented the photo, yes I know, don't we look young!. 
 I cut out one of the laser cut hearts from the Speciality DSP and used it as a mask, laying it on the frame and sponging crumb cake ink over it, when you remove the heart it makes a great outline. I have used this technique a lot lately, if it stands still it gets sponged!
 The second thing I want to show you is a quick card I made using the heart I used for all that sponging. The back sides of the hearts are white so you can ink them up and change them to match your colour scheme.
I did some more sponging on very vanilla card then stuck the heart down, the sentiment is from the Pursuit of Happiness stamp set. I think this would make a lovely Wedding or Anniversary card.


Thank you for popping over, the next hop along is to Katie's blog.
There are lots of things going on in the world of Stampin' Up!, the new Spring/Summer Seasonal Catalogue starts today and it is also Sale-a-Bration time. I will update my blog with all this new info ASAP!