The last of my fancy fold cards a double pocket card. I have seen this card made out of DSP put I made mine out of certainly celery card as I have lots to use up before it retires then decorated with DSP from the Brights Paper Stack, (which is also retiring as we are having a colour refresh and will be getting new ones). I used the Itty Bitty and Pursuit of Happiness stamp sets, two tag die, paper daisies and melon mambo scalloped ribbon,all retiring.
The inside of the card
I made the two tags into bookmarks, the smaller one is actually doubled up and has magnetic strip inside. Just fold your card in half and put the fold line below the top cutting edge, other wise you will end up with two tags!.
Mu colour scheme is melon mambo, tempting turquoise, pumpkin pie and certainly celery. Here is the front of the card without the tags in. Barbara suggested it would make a great card for a bookworm as you could have the book mark in one pocket and put a gift card holder with a book token in the other pocket.
Take a look at the retiring lists and let me know if you fancy anything as things are going quickly.
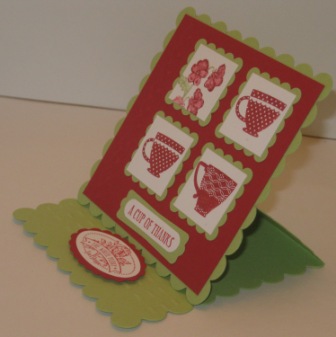
Some more retiring products to show you today. I made an easel card using the scallop square die, punch and Tea Shoppe Stamp set. The colour scheme is certainly celery and riding hood red, not a combination I would usually put together but I like it. I also used the simply scored borders plate (not retiring!) if you look carefully.
Here is my card:
Side view so you can see the easel.
I have been making the most of some stamp sets before they retire. Today's stamp set is Nature Walk and I thought I would make a joy fold card. Lots of stamping on this card as I made my own 'background', the colour scheme is Not Quite Navy and Baja Breeze which are also retiring. I will really miss Baja Breeze. Here's my card flat, I coloured the bird in using inkpads and aqua painter:
The front section is tucked behind the oval, if you slip the corner out it opens up:
Hope you like it, I have another fancy fold to show you tomorrow.
The last of the Open Sleigh cards, (I think!), this is another fancy fold card. Start off with a square, this one was 8" x 8", score/fold in half both ways so when you open the card up its divided into quarters. Then score in half diagonally, (just one way), open up then push the corners with the diagonal fold in and the card should just fold up. I forgot to take photos of this so hope it makes sense.
Here's the card:
When you open it up:
It would be nice to put a photo inside. Just remember not to stick the ribbon on the back of the card otherwise it won't open, (oops!). Here are all the cards:
Another Open Sleigh card! This is a twist fold card, I saw this fold on an Inspiration Station by a very talented S.U. demonstrator whose name has slipped my mind (sorry) at Julies Team Training. Cut an A4 card in half length ways, use one half for your card base. Make a score from the top left corner to the bottom right, then fold it over.
Then score and fold it in half in the middle. use a piece of DSP 5mm smaller than your card base and score in the same way as the card but then cut on the score lines so you have four pieces to decorate your card.
I will show you the last card tomorrow.
I have been admiring some Criss Cross cards I've seen but wasn't sure how to make them. I had a look on you tube, (what would I do without it!) and it seemed a lot of card stock to use for one card but then I found this tutorial. The no waste criss cross card, you can make it out of half an A6 card blank by cutting your card front in half diagonally then flip the traingle you have cut off over to stick back on the card, (watch the video it will make sense - promise). My photo's are just a guide I found it better if the triangle still attached to the card is on the right side and not the left as in this picture. Just fold your card the other way to do this


Cut a piece of DSP 14.3 cm x 10cm then cut this in half diagonally as in card front, Flip a triangle over and adhere to your card front triangles, I used the festival of prints DSP stack as it's nearly the right size. I used the scallop trim border punch and added strips of that before sticking my card and making the pocket I used a piece of card at back as a stand.
Here is my card, I used Greetings of the season and that new hostess set out the seasonal catalogue - the name has deserted me. Colour scheme is cherry cobbler and lucky limeade and I added some tulle ribbon.