Showing posts with label lovely as a tree. Show all posts

Monday, 11 November 2013

Quick Lovely as a Tree

Another lovely as a tree Christmas card.  This one is very quick to make, great when you have a lot of cards to make.  I stamped the trees in midnight muse then smoky slate to give it a blurry effect, honest I did it on purpose. It is mounted on midnight muse card and the base card is soft sky. The sentiment is from the Greetings of the Season stamp set from last years seasonal catalogue but is still available to buy.
 Here are all three cards together:

Stamp sets:

Lovely As A Tree Clear-Mount Stamp Set127793
Price£19.95

Greetings Of The Season Clear-Mount Stamp Set128033
Price£10.95

Sunday, 10 November 2013

Christmas Lovely as a Tree

Here is another Christmas card I made using Lovely as a tree.  I stamped the trees using midnight muse ink, this time there is only a little bit of sponging.  The little deer is from Warmth and Wonder, a hostess set in the seasonal catalogue. I embossed the aperture again using iridescent embossing powder.
This is quite a quick card to make but looks really nice.

Saturday, 9 November 2013

Lovely as a Tree and Embossed Aperture

I watched THIS video from the very talented Michelle Last on how to emboss a border made from a framelit and I just had to give it a go. I got out my old faithful stamp set Lovely as a Tree, stamped the tree in versa mark ink then heat embossed using iridescent embossing powder. I then used sponging and masking make to a winter scene, the embossed aperture just sets it off nicely.
 You can see the border around the oval aperture, it is a great technique, thank you Michelle for sharing it.

Friday, 16 November 2012

Lovely as a Tree, salt and brayering

One of my favourite stamp sets is Stampin' Up's Lovely as a Tree, it is so versatile, great for men's cards, sympathy, Christmas, etc. My first card is a very simple Christmas card, the sentiment is from greetings of the Season and the colour is Midnight Muse.

I then dusted my brayer off and tried a little winter landscape using pacific point, (my new favourite!) and a post-it note punched circle to mask my moon. The snowy effect was made by using table salt, sprinkle it over your card, roll it through the big shot then brush off, brayer as usual.


We practised brayering in the Wednesday class last week, doing some things for a calender we are making, I will show you it once we've finished. It was nice to try a new technique and some ladies took to it like a fish to water! If you would like to come along to one of my classes just let me know. I will be setting a  new schedule for next year so keep checking and if there is anything in particular you would like to do I will try and fit it into the schedule.

Monday, 15 October 2012

Flash Card Challenge - Card 1

This is my first flash card I made using the flash card challenge kit. (See yesterdays post if you're not sure what I'm on about).
I made a diorama card using half a sheet of river rock card using the third smallest label framelit, (keep the cut out label to use for another card) see Sally Jo's instructions. I used a soft suede and very vanilla card piece.  Cut the 3rd smallest label framelit from soft suede piece - you will need to put it at an angle. I punched a 1" circle and modern label from the middle of the soft suede framelit (this will be covered up by very vanilla) then cut in half lengthways.
I stamped the large tree from the lovely as a tree stamp set in always artichoke ink. I cut this out using the 3rd smallest framelit again.  There were missing edges so I just cut this level between the curves on the side. I used the two halves of the soft suede framelit to edge the very vanilla.
Using some of the spare very vanilla card in the kit I stamped Merry Christmas in soft suede (From Teeny Tiny Wishes set) and punched out using word window. I stamped the pine cone in always artichoke and punched out using 3/4" circle punch. I mounted these on the soft suede modern label and 1" circle. I added some soft suede taffeta ribbon. If you have survived the instructions, here is my card:

And a different angle:

Thursday, 7 June 2012

Lovely As A Tree - Card for Men

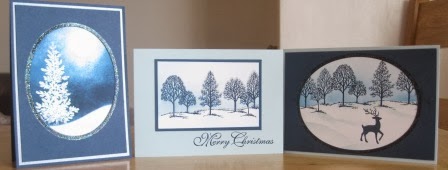
Here is another card we made at the Mens Class. This time we used Lovely As A Tree stamp Set - this has to be a classic stamp set for many occassions, it is great for mens cards, Christmas, Harvest and Sympathy Cards to name but a few.
We didn't use any DSP on this card, instead we made our own background using stamps for the set. I used blender Pens to colour in. I used a little bit of old olive satin ribbon, just knot it and wrap around the corner.

Recipe
Card Stock: Crumb Cake, very vanilla, old olive and soft suede
Ink: crumb cake, early espresso, soft suede and old olive
Stamp Sets: Teeny Tiny Wishes & Lovely As A Tree
Punches: word window and modern label
Accessories: Old Olive Satin Ribbon

Friday, 23 March 2012

Lovely as a tree - Shoe box swap

A few weeks ago I took part in a shoe box swap with some other demos in the area. What on earth is a shoe box swap I hear you say.  Well, it is where everyone designs a card and puts everything you need to make it in a shoe box. We then got to make everyones design.  I haven't got round to photographing them all yet but this is the one I designed.
I thought I'd make a mans card for a change. It is a twisted easel card using the lovely as a tree stamp set. I just used one ink pad, not quite navy, to get the different shades stamp onto scrap paper before you stamp onto your card.

The DSP I used is called well worn and it's great for mens cards and I used some denim ribbon. I made the photo corners using the square punch. The birthday stamp is from the happiest birthday wished stamp set which you can only get by hosting a workshop, it is a great value set and I seem to be using it a lot. If you would like to learn different stamping techniques and how to make the most of your tools why not get in touch with me and book a workshop/stamping party or come to one of my classes, I will be poting a new class schedule in the next few days so pop back and take a look.
We all had a lovely day and I will post the cards and box I made soon and THANK YOU Margaret for the beautiful buffet lunch she made us, it was a big surprise and very scrummy!

Friday, 23 December 2011

More Christmas Cards

Well not long now before Christmas, are you all sorted for the big day?  Here's another Christmas Card I made this time using the ornament punch and contempo christmas stamp.  The branches of the christmas tree were made using the lovely as a tree stamp.


The colour scheme is cherry cobbler and old olive, I used the spritzer tool with the marker pens to make the splatter. I used the contempo wheel for the insert.