Tuesday 25 February 2014

Happy Birthday Accordion Card

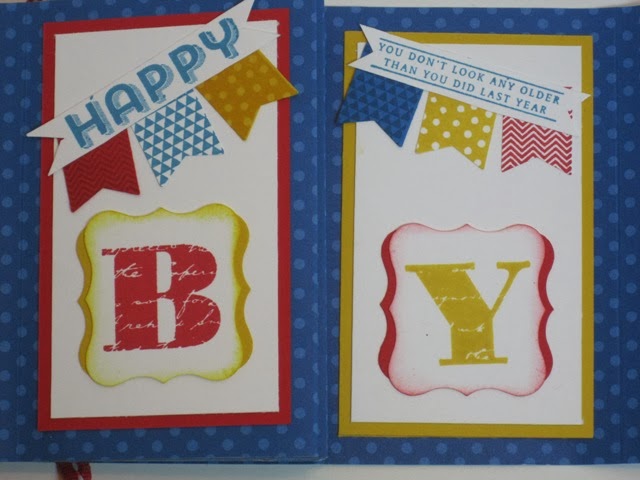
Yet another accordion card, I love them! In contrast to yesterday this one is very bright using pacific point, crushed curry and real red.
As this is for my work colleague I made lots of places on the back of the card for us all to write our best wishes.
Here it is folded up:
I used the Morning Post Alphabet, See Ya Later and Banner Party stamp set and banner punch, the last three being Sale-a-Bration Products. I also used the chevron punch.
Here is a close up of the sentiments taken from See Ya Later.

Monday 24 February 2014

Tag Topper Punch Accordion Card

Well, here is Julie's Accordion Card I mentioned yesterday. I love this card designed by Julie, it uses quite a few Sale-a-Bration products, Sweet Sorbet DSP, banner party and the See Ya Later stamp set!

Julie used the Scalloped Tag Topper Punch to make the cards closure:

The colour combo is taken from the Sweet Sorbet DSP, pool party, summer starfruit, crisp cantaloupe and pistachio pudding.

Sunday 23 February 2014

Chevron Punch Showcase & Colour Me Challenge

I have succumbed to buying the Chevron Border Punch and I love it, why didn't I get it earlier?! I had great fun using it in this accordion card I made. As some of you may know life is a little bumpy in the Smith household at the moment and if it wasn't for my wonderful brother and sister-in-law Neil and Sue I don't think I could cope. Here is the card I made to say Thank You. I adapted the card from the accordion card I made in Julie's training, (I don't think I've showed you it yet), Julie used a 12" x 12" but I used A4 size card. The colour combination comes from the Colour Me Challenge #8 
Here is my card, I had to put it on the mantle piece to get it all in.

This is the back, I used the chevron punch to punch the card base so you can see the colours from the card mats coming through. I used the punch on the card mats so there are 'brown sugar'  chevrons on the bottom border. The top border inside is made from the punched out bits.
Here it is folded up:

Stamp sets used were, Morning Post Alphabet and You're Lovely.

Sunday 16 February 2014

Classy Crafter on Folksy

As my home is over grown with all my hand crafted items I have decided to open my own Folksy Shop. I have only listed a few items at the moment but there are lots to put on. Please take a look at my Folksy Shop, there are going to be some lovely items on there like my special mini album.


If you would like to order a mini album from me just send me an email, I would love to make one especially for you. 

Thursday 13 February 2014

New Home Note Set

As I said in my last post I have some new neighbours so I thought it would be nice to make them a little gift and card. I used the Sale-a-bration banner punch and matching stamp set. I have gone for the colour scheme of real red, coastal cabana and crumb cake again. This is a really quick and easy card, I used a stampin-write marker and white gel pen to make the faux stitching.
I made four matching notelets and holder as my gift. I left the inside of the cards blank so my neighbour can use them as change of address cards or just little cards to say hello. I made the holder using a sheet of A4 card again, the DSP is from the Fresh Prints DSP stack in the Spring catalogue.
 These are the matching notelets:
 Here is the set altogether:

Saturday 8 February 2014

ILWS Sale-a-Bration Blog Hop

Hi today is In Love With Stamping's Sale-A-Bration Blog Hop, you may have come from Sandra's Blog. There are lots of gorgeous Sale-A-Bration products to choose from and I decided to hi-light the Petal Parade Stamp Set and Sweet Sorbet DSP. 
I adapted this tutorial from Rachel Tessman which used a sheet of 12 x 12  to make a note holder. I used a piece of crisp cantaloupe A4 card and decorated it with some Sweet Sorbet DSP and flowers stamped using the Petal Parade stamp set.
Stampin' Up' notelets and envelopes fit perfectly inside so it makes a lovely gift.
Here are the notelets I decorated to go inside the holder:
I love making these notelet holders, I made another set for my new Neighbour which I'll show you another day.Thank you for popping over, the next blog is the lovely Donna's.

Monday 3 February 2014

Boxed Thank You and Colour Challenge

If, like me, you often browse pinterest for inspiration you will have noticed 'Box in a Card' cards are very popular at the moment, they are surprisingly easy to make too, there quite a few tutorials on you tube! For my swaps for training a few weeks ago I made 20 so I adapted the size to make a 'mini' version, (you can make two card bases out of one sheet of A4 card) so I didn't run out of card. Unfortunately I can't show you my swaps as I forgot to take a photo (duh). So I thought I would make one as my entry to the Fab Friday colour challenge 
I used some new products from the Spring/Summer catalogue, the Fresh Prints Designer Series paper stack, Petite Petals stamp set and matching punch and some 'old' sets, Hello Lovely and Flower Shop. Although it looks quite an extravagant card it is actually quite economical to make as with careful cutting I only needed one sheet from the paper stack.

Here's a close up, I think the coastal cabana, real red and crumb cake colour scheme give it quite a retro feel:

From the side,

.....and folded flat.

I have been using this colour scheme a lot lately as it matches the fresh print paper stack so whatch out for more of it.

The Big Shots had a Baby!

No I haven't gone mad, Stampin' Up! have introduced a new product, the Texture Embossing Boutique.
Click Here to watch a video
This compact and portable embossing machine can be used with all of your textured embossing folders. It is really quick and easy to use and great if you have limited space or on the move. The Texture Embossing Boutique (order no.132657) costs only £26.95 and makes a great addition to your crafting tools. To order yours just contact me or go straight to my on-line shop.