Sunday, 31 March 2013

Three Challenges in one card!

Two blog posts in one day, it must be Easter! Last night I went over to my friend Val's to play, (oops, I mean to have a creative crafting session). I wrote down a few challenges for inspiration and we had a go. My card combines three challenges:

I must say I did find it a challenge, I would normally have teamed that colour selection with very vanilla rather than white and the card needed to be clean and simple, (put the sponge daubers away Anne-Marie!) but after a lot of dithering here is my card:
 The stamp set I used was Tea Shoppe. I inked the cup stamp using raspberry ripple and chocolate chip, (doesn't that sound yummy), markers then spritzed with water and stamped onto primrose petal card, then fussy cut it out. Two lots of flowers are stamped directly onto the card and the third one was cut out. I did some faux stitching with the raspberry ripple marker and white gel pen to frame the image a bit more. The scallop trim was made using one of my favourite punches the dotted scallop ribbon border punch.


Easter Punch Art Card #3

Happy Easter. Here is a more traditional Easter Card which I have cased from this ladies lovely blog here
The cross is made from the modern label punch. The background is stamped with the flowers from the elementary elegance stamp set using pink pirouette ink, again I used Teenie tiny wishes for the sentiment, the flowers are from the boho blossoms punch. 


Here are all three cards together:

Join Stampin' Up and get 25% Extra Offer Extended!

This is a sticky, please scroll down for my Latest posts
JOIN Stampin Up during sale-a-bration and choose £162.50 of products for your Starter Kit for only £99!  This offer has been extended until the 31st of March. Don't miss this amazing offer, contact me now to have an informal chat and find out more.

Saturday, 30 March 2013

Punch Art Easter Egg Holder

I dug out my little lamb Easter egg holders, as I said yesterday I have already eaten the egg but it holds a cream egg size egg. Firstly take a 3 1/2" square of whisper white card, score each side at 1" and make into a box.
Then make a lamb the same as yesterdays and for the back use 1 3/4" scallop circle punch, the smallest flower from boho flowers punch and the word window for the legs.
Here are the back and front of the holder:

Here are a his and her pair of egg holders, she is looking a bit cross eyed though!
A matching pair, the card and egg holder:

Friday, 29 March 2013

Easter Punch Art Lamb

As promised, some more punch art, again this is not my creation, I found lots of punch art in blog land.
I love this little lamb and he went down very well in class, we actually made a girl version, she had a little pink bow in her 'hair'.
The clouds are made using the build a cup cake punch and the fence is the word window punch. Sentiment is from teenie tiny  wishes.  I also did an everyday version using the Thinking of You sentiment from the set, I used a marker to ink up and stamp Thinking of then used the thin end of the marker to write EWE! The field is certainly celery card which I embossed using the dot folder and  inked the edges.
Here are the punches I used.  
I also made a little Easter egg holder that was a little boX to fit the cream egg and lamb face/body on front and his/her bottom at the back, I forgot to take a photo but will try and do one to show you as it is really cute, already eaten the egg though!

Thursday, 28 March 2013

Easter Punch Art Bunny

Bet you thought I'd disappeared? I've just been busy, but I'm back! I thought I would share some of the Easter punch art cards we did in class the other week..  They are not my own creations, I was inspired by all the punch art cards I have seen on pinterest. The first card is a very cute bunny, this is the front of the card

 Then open the card and here he is....

 As I said, this is not my own idea and there are lots of bunny cards in blog land, I'm not sure where they started. I don't know if this shows up much but here are the punches I used.
More punch art tomorrow.

Friday, 22 March 2013

This is a sticky post so please scroll down

It is Sale-a-Bration time again! It is one of my favourite times of the year as you can earn a great FREE products. Have a look on my Promotions Page to learn how!

Wednesday, 6 March 2013

Gift Card Holder and FREE TUTORIAL

This is the gift card holder that matches the little album we made yesterday. It is made from half a sheet of A4 card and more of the Sycamore Street DSP to decorate.
 This is the holder opened up. There is space for your gift card and a message.
 Here is the holder and album together
Here is a little tutorial for the album and gift card holder. Please feel free to use it but please link back to my blog if you post it on your blog, thanks.

Tuesday, 5 March 2013

Another one sheet Mini Album

Here is another mini album/card, inspired by Kellys creations this time I made it out of a sheet of A4 card cut down so it's 11 1/4" long. This is what the ladies made in class last week. I forgot to take a photo of the front of the album by itself, but here it is with the matching gift card holder we made, the album is the bigger one.

This is the album opened up, we used the Sycamore Street DSP from this years Sale-a-bration to decorate and the matching ribbon and buttons.
I will show you the matching gift card holder tomorrow.

Monday, 4 March 2013

My photography 'studio'

I don't know if you have noticed, but hopefully my photos have been looking a bit better lately as I have been using my new photography 'studio'. I say 'studio' as I made it myself by using three cardboard backs off the DSP packs! I used kraft tape to attach two card squares to adjacent sides of another card square. I made a hinge out of a piece of white card and stuck it to one side and then used velcro dots so that I can join the sides together so they stand up when I want to take photos. I can then unfasten it and store it away flat. Hopefully the pictures will make it clearer. Here is my 'studio'.

 This is the hinge I made, you can just about see the other half of the velcro dots if you look to the right of the centre line.

Here it is folded up ready to store away.

Sunday, 3 March 2013

One Sheet Waterfall Mini Album

This little mini album is made from one sheet of 12" x 12" card. It is from a tutorial I found on the lovely Kelly's Blog here, it's a lovely little album which would make a special little gift instead of a card. I used some retired nursery nurse DSP to decorate it, I left it quite plain but will definitely have another go with some 'new' DSP. It folds up to 3" x 4", this is the front.

 When you open it up the page folds down so you have lots of room for photos.
 Then turn the page over, it is decorated on the back and then the next page folds down. 
It's a great tutorial and Kelly has some lovely things on her blog so it is well worth popping over to see her.

Saturday, 2 March 2013

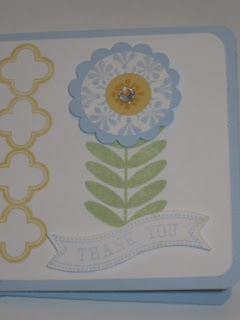
Pastel Madison Avenue

All the cards I have made using the Madison Avenue stamp set from Sale-a-brations have been quite bright and bold so I thought I would do a pastel version. These are my February thank you cards for my customers.

 The colour scheme is bashful blue, so saffron and certainly celery.  I also used the itty bitty banners set which you can get free during Sale-a-brations.


Friday, 1 March 2013

One sheet Mini Album

When I went on Julie's team training a few weeks ago I received this little mini album from the very talented Nicki as a swap.

I loved it and thought it would make a great item to demonstrate at Evelyn's party. This is my version using some the papers, ribbon and Maddison Avenue stamp set from Sale-a-bration. Nicky used thechip board packaging from the glimmer card to make her front and back cover. I didn't have time to cover that with DSP  during my demonstration so I used two pieces of card stock stuck together instead! I also covered the spine with a piece of DSP. The colour way is pool party and island indigo.
Here is my version: